waterless sea

I have a tumblr dedicated specifically to my cosplay progress! WordPress was my go-to for the past five years, but I once again ran into the same problem I did when I first started it. It is exceedingly difficult to build a following on WordPress and to answer questions in a timely fashion.

So instead, I turned to my favorite blogging platform! You can still follow my personal tumblog if you’d like, but everyone knows I fail at tagging things so to help narrow your search, visit http://waterless-sea.tumblr.com

I will still keep WordPress as my cosplay index so don’t forget to bookmark that one as well! All of my posts to date will still stay on WP [mainly because it’s way too much trouble to import them all] but any future progress notes and photos will be on tumblr.

I always meant to write con reports and never actually got around to it [I always did Portal’s though] so it’s my goal in 2016 to write them. I will post those, any product reviews, and tutorials on WordPress, and a short preview and link to the site on tumblr.

As I said in the “about me” section of waterless sea:

I’m constantly looking for ways to improve and even reinvent myself.

So I’ve decided it’s time for me to reorganize. WordPress is best for my “cosplay guides”–detailed descriptions on each of the cosplays I’ve made. My personal tumblr is just that–personal. And the million of cosplay social media accounts I have–well, that’s to keep on top of the game, ne?

So why the name “waterless sea?” It is the title of the second book in a beautiful fantasy trilogy by Kate Constable. Read it and you’ll understand why I thought it fitting for my latest rebirth.

The Waterless Sea is ultimately a tale of arrogance and loss. Despite that, it is also a story of rebirth and reformation. Every thing I have ever done up until now has had some kind of purpose and I’m on a mission to find out what it is.

Sometimes, we need to reinvent ourselves to find out who we really are.

This is my reinvention.

Leave a comment

Filed under Cosplay, Personal

judar | day thirteen + fourteen

I went over to Luke’s this weekend to finish working on Judar. I mainly helped the guys out with their costumes on Saturday and finished all twenty bangles that night.

Thank God.

I have to adjust the size on some of them because they’re too big but that’s something I can do before work every day. I can’t wait to finally prime and paint these.

Sunday, I was able to work on my own costume. I tapered in the sleeves of my choli (and discovered my left arm is actually bigger than my right wtf) and made my chunnari. However, my choli just wouldn’t sit right in the shoulders anymore.

Did I lose that much weight already? Impossible.

Utterly bewildered, I called my bestie Chetana about it. She wears cholis all the time for special occassions and was able to tell me a bit about how they are constructed and worn. I had no idea you are not supposed to see any kind of stitching on them at all.

Also, she couldn’t believe just how scandalously short and inappropriate Judar’s choli was. I told her that I made mine longer because boobs hahahaha.

I put a zipper in the back center seam because she told me that is the design. Additionally, the chunnari isn’t actually a traditional chunnari, more like an infinity scarf. I know from years of watching Chetana and Nikki put on saris that everything in Indian fashion is entirely dependent on how well it fits the body and how well you fold the fabric. She also urged me to sland the chunnari to the back to hide the zipper (since that is what they usually do to hide seams–use jewelry, chunnari, arms, etc.) but that’s no problem because Judar does that anyways!

I had two different sizes of single fold bias taple and after comparing both of them, I went with the the 1/4″ size. After sewing down the initial seam, I looked and realized I should have gone with the bigger size instead. Ugh. Seam ripping.

My choli still fits a little funny in the shoulders and I wonder if that will be fixed if I add in a hook and eye. Maybe I should just add in darts anways.

Ugh. Decisions.

Test fit for the whole thing!

I like how the loose choli gives me a slimmer appearance. Still gotta tone the hell out of my midriff, make my wand and necklace, and finish my wig and bangles!

Leave a comment

Filed under Uncategorized

judar | day… something. let’s say twelve

I’m so sorry that I have not been updating! December is always really busy and with me working two jobs and going on vacation to bury my grandfather in the Philippines, I didn’t exactly have time to write.

Anyways, I did finish building the base for my wig!


I also painted them black. You can see how the first sphere has a flat back and while I did contemplate buying more foam and fixing it, I decided to leave it to give the braid some support against my back.

I didn’t take pictures of the next few steps because my hands were busy, but I did use thick thread meant to sew heavy fabrics, a long piece of wire, and hot glue to thread them all together. Then, I carved a hole at the top of the braid and glued in a few rows of wefts from a clip in ponytail to start covering the braid. I also took a section of those wefts and looped them through the base of my wig to support the braid.

12291071_507546926073559_624087335709661279_o

Tada! All covered up with that initial sections  of wefts. I’m sorry the pictures so blurry!

The wig I ordered still has a rattail of its own, which is braided in this picture and clipped out of the way, so I undid the braid and started covering the spheres with it to lend even more support.

Somewhere along the way, I lost support and now my braid leans a little to the left. :/ I can fix it later on, but it’s just annoying.

Glued and sprayed the rattail down until the fibers ended. I have to go and cut more wefts to continue covering all the bald spots.

In the meantime, I worked on his clothes and abs. I sewed in the elastic waistband to the pants but I know I’ll have to take them in later.

12239183_507044019457183_4802044884923998374_o

I just love how they turned out! It’s a little awkward to walk in them because the crotch seam is so low but whatever.

I also made his choli. Initially, I wanted to put in my zipper in the side seam, but I don’t know why I cut open the center back seam when I made my pattern.

12291148_507044762790442_7908406330430577514_o

I also need to taper in the sleeves. No idea why I didn’t even think about that before.

Then, I figured I’d start over on the choli so I could put the zipper in the right spot and taper the sleeves. Bought another yard of sateen and lining, but my pattern would not just come together. It was always too tight in the arms and shoulders no matter what I did. Clearly not an experienced seamstress’s work.

So I went back to my original choli, pinned the center back seam closed and tried it on with my ghetto binder that I also made that same evening. To my frustration, it fits without needing a zipper. I still have the option of adding darts and being able to pull it over my head.

Dude. Why.

I’m just going to taper in the original choli’s sleeves and sew the damn thing shut.

Still need to drop the neckline all the way around. Since I’ve made my binder, I can now figure how low I can drop it without it or any remnant cleavage showing.

I just want to be done with it.

I also went back and worked on his jewelry. I wasn’t particularly happy with how my bangles came out, so I bought a bangle bracelet in the Philippines to use as a curve mold and some spring hinges so I could snap the bangles on and off. However, my initial attempt using recycled worbla from the first batch were completely unsuccessful.

Nuds bought me a sheet of Terraflex and I’m going to roll those into bangles that can slip over my hand instead. I’m still going to use the spring hinges to make my necklace because there’s no other way for me to put it on.

I also found leftover Wonderflex from Azula. I can now make my wand without a 3D printer!

It also just occurred to me that Judar will use nearly every kind of thermoplastic available to cosplayers. The only one I don’t have is Worbla’s Black Art, but what on earth could I use it for in this costume?

Don’t give me ideas. Please.

Leave a comment

Filed under Cosplay, Magi, Uncategorized

judar | day four

My C.diff cow poop piles finally dried. Yesterday, I went to flip them over but the three biggest piles were still damp on the bottom and I stuck my finger right in the middle of one of them right before I went into work.

Tip! It says right there on the canister, but acetone will clean up any expanding foam messes. I wish I knew that when I accidentally got some on the carpet of my apartment but it’s tooooo laaaaatttteeeee…

If you use acetone to take off expanding foam from your skin, do it over a sink and have warm running water nearby. When you rub the acetone on your fingers and take off the foam, you will need to wash your hands extremely well to rid your skin of acetone. Prolonged contact to any kind of chemical is not good and may cause chemical burns!

[Yes, I have a degree in chemistry. I do know what I’m talking about.]

Anyways, this morning, I was able to peel the three big piles from the wax paper. They were still a little soft in the center so I left them to air dry before I went to work. After meeting up with a friend, coincidentally to talk about getting started on a cosplay project of his own, I ate dinner and drove to the post office to pick up my wig!

It was really exciting getting the package. I’ve never had to pick up a package from the parcel locker and was giddy upon seeing the key in my mailbox. I knew I ordered a long wig and a long clip on ponytail, but seeing the box was surreal.

I opened it up when I got home and found a pretty present inside! Arda sent me a beautiful compact mirror with their logo on it and it’s perfect for touchups during an event! I will have to remember to pack it in my con box whenever I go out.

I pulled the wigs out of the box but left them in their bag to prevent them from tangling.

Then, I cleaned up my current workspace, sweeping the floors and mopping the tile. Luke left the box to his sewing machine at my house and I was going to throw it away but I taped it back together and decided to use it as my scrap bin instead.

My foam piles are flat on the bottom and rounded on top. They are much larger than the diameter I wanted but they are not spherical at all. In order to carve them into a sphere, I marked the center of each side as a point of reference. On all of my piles, the diameter marking I drew as a reference on the wax paper transferred to the underside of the foam and I also used that as a guide when carving the spheres.

Tip! As Malindachan pointed out, she used a box cutter as her main cutting tool. I did too, albeit a smaller one. In order to turn this weird pancake into a sphere, I always cut in tangental lines to my surface and moved a little bit at a time.

My first sphere barely hit the six inch diameter mark and the next two after that also barely hit their intended diameters, but I called it good enough. My biggest sphere was also my first one and I didn’t round the bottom at all because I was scared to loose too much foam from the carving process. I might leave it slightly flat just so it can rest comfortably against my upper back.

I got through six of nine balls in two hours before calling it quits. Some of them I will have to go back and continue trimming them down because they’re too big. I debated on getting another canister of foam to fill in the gaps on a couple of the spheres but I may not do that in favor of having a flat surface against my back.

In the morning before work, I’m going to see if I can finish carving the last three balls and get my braid ready for painting and stringing them together!

Leave a comment

Filed under Cosplay, Magi

judar | day three

I need to decide which way I’m going to spell his name… I know it’s supposed to be Judal when you look at the original Persian, but I used the Japanese Judar when I started working on this.

Ugh. I guess Judar it is for consistency’s sake.

Anyways, I bought my wig from Arda on Sunday! It’s their Vegas in black. I also bought a long clip in ponytail for extra wefts in the same color. I’ll be following Malindachan’s tutorial to style my wig but I may make some alterations.

Today, I bought the final piece I needed for Judar and I’m about to start making foam balls!

My friend Shona styled her Judar wig using Christmas ornaments. When I walked into Lowe’s to buy the foam, I got extremely distracted with looking at the ornaments. Lowe’s had some really nice large round ornaments that were the perfect size for the initial segment of his braid but I told myself not to give in on the basis of cost.

I did take note of their size and will be approximating my segments based on the ornament I found.

I’m a real stickler for proportions so  I based everything off that Christmas ornament. It was about 6″ in diameter and to simulate the natural downsizing of a braid, I made balls in decreasing half inch diameters. I drew a template on wax paper and taped it down.  

 Now it was time to spray the foam. I bought two cans of this:

 Not gonna lie, but it looks like a pile of C. diff infected cow shit.  

 I hope that when they’re finally cured, they’ll swell to twice their size. Whatever you do, do not touch them once they start to set! I did that with the big one to try and mold it into less of a pancake shape but almost ruined it instead. 

To pass the time, I decided to work on Judar’s jewelry. I measured the diameter of my wrist and forearm, the length of my forearm, and calculated how wide each band had to be for ten bands and the diameter of each. With the glue side up, I stuck my strips together until I had this:  

 
It was too short so I added in two more bands. At this point, I knew the only person who would care about the extra bands would be me. 

Then, I overlapped the ends and pressed them together. I rounded the outside edges and pulled where necessary to lengthen the whole piece and make the bands more uniform.  

 It’s a funny shape so I kept heating and molding it with my fingers until I got the desired result. 

One bangle is longer than the other so I have to fix that tomorrow. I set both pieces to cool in the pullout freezer my parents have in the basement where I work which is super handy for small worbla pieces like this. 

Tomorrow, I have to fix the shorter bangle and line the inside with felt or cotton to prevent the thermoplastic from rubbing against my skin and to help hold it in place. 

I checked on the foam circles before I closed up shop and to my delight, they are slowly expanding!  


Leave a comment

Filed under Uncategorized

[cosplay guide] ren kougyoku

Ahhhhh! I finished Kougyoku at last and now it’s time for my construction recap!

Dress: I made the bodice out of ivory casa satin and the skirt out of red taffeta from the clearance section. The ruffles are yellow silk-like fabric gathered with my ruffle foot and attached in between the satin and the yellow lining. The skirt was also gathered using my ruffle foot. I purposely made the dress loose fitting because it fits with the time period. The sleeves gave me the most trouble since I made them too small around the wrist the first time but that was fixed by inserting another panel. I tried to avoid having ruffles sewn on the edge of the yellow part of the sleeves, opting to have a loose yellow silk layer, but the ruffles didn’t show up very well so I ended up having to add in another three yards of extra yellow silk ruffle just so they would show up. In order to add volume, I wore my mother’s wedding petticoat she gifted to me underneath it.

Green Overskirt: We used this iridescent green taffeta last summer for Mike’s Earth King cosplay and I knew I wanted to use it for Kougyoku. I actually bought the red taffeta for the dress despite owning yards upon yards of red dupoini just so it would match better. The black trim is satin with white bridal satin circle appliquéd on. The trim is blind hem stitched to the green skirt. The entire thing is gathered at the waist with an elastic waistband.

Pink Overskirt: This is dark pink satin with a petal pink satin bias tape. There is also a petal pink lining on the inside and interfacing sandwiched in between the layers. Of all the pieces, this was one of the most difficult to construct and I need to remake it with darts to drape over my skirts better.

Pink Shawl: This was by far the most difficult and time-consuming piece to construct aside from the hairpin. The patter was easy to draft but I think I made the shoulders a touch too broad. Oh well. It took several attempts to get the collar right and the trim is made the same way as the green overskirt. I made a thin ribbon from leftover red taffeta for the bow around her neck.

Green Sash: There are two green sashes made from the same taffeta as the overskirt. The one around my shoulders actually has some wire-edged ribbon and 18 gauge wire inside to help it stand up and “float.” It is secured to my shawl with safety pins at the shoulders.

Hairpin and clip: Both were made from worbla. I used modge podge to smooth out the layers and a ton of paint. The heart shaped sections are actually heart beads left over from Lucy. The jewels are actually TranspaArt painted with red anodized paint and silver paint. The gold chain is a gold necklace cut to size.

Wig: I made two felt loops and sewed them to the top of my old Gou wig. Then I took sections of hair and glued them to the felt loops to make the “rabbit ears.” The rest of the hair was pulled into a ponytail and separated by spraying each section with Aquanet. I don’t like how this wig turned out because of the gross texture but Rin is styling a new wig for me for Christmas!

I had a lot of fun wearing Kougyoku and hanging out with my Magi squad! She was surprisingly fun to wear and has quickly become one of my favorite costumes.

Until next time!

Leave a comment

Filed under Cosplay, Magi

I literally can’t even | naka-kon 2016 plans

A couple months ago, Luke and Nuds were chatting about competing in Naka-kon’s cosplay contest together and somehow or another, they bring up Tsubasa, one of our first projects together. In light of the skill set we’ve gained since that disastrous first attempt, the boys decide we’re going to enter it into the cosplay competition under the intermediate category because they’re not quite up to Master-level personally, and Laura and Sarah are entering Master-level with Haytham and Connor.

We’re chatting about it today and much to my surprise, they said they want to do an art book version rather than recreate the original costumes. Whelp. So much for being ahead of the game and buying all that crap for Syaoran last Monday. I’ll probably keep it and make it anyways just so I have one more costume in my box for me and Zwei to wear.

Luke finally settled on this:

Tsubasa-.RESERVoir.CHRoNiCLE.full.380252

Which is one of my favorite outfits. So we started looking through the internet to see what other cosplayers have done with this particular set. We found a beautiful group from Katsucon a couple years ago but while studying the detail work on their Fai’s outfit, Luke saw an album on her page and said, “What is that? It’s so cool!”

Nuds and I looked at what he’s pointing at. To my surprise, it’s none other than Yunan from Magi: the Labyrinth of Magic.

The funny thing about Yunan is that Sarah and I always envisioned Luke as Yunan if we were to ever cosplay the series as a group. It would be either him or Ka Kobun to keep up with his Vic Mignonga spree.

We tossed around a couple more ideas–Nanatsu no Taizai, Arslan Senki, League of Legends–but Luke said again, “I want to be Yunan! He’s so cool!”

“I want to be Sinbad!” Nuds added.

I paused at this point. Do I tell them? Should I even encourage this? Why does it always seem like i pick our group cosplays when I honestly have had nothing to do with anyone else’s decisions?

Let’s talk logistics for a moment. Since it is just the three of us, we have to have a trio that makes sense. When considering Tsubasa, it was always going to be Kurogane, Fai, and Syaoran. However, as Luke pointed out, the Tsubasa group loses its impact when you’re missing Sakura. Therefore, for whatever project we picked, we needed to have a trio that could stand alone.

At this point, it makes sense given Luke’s insistence on Yunan to choose the era’s three Magi: Judal, Yunan, and Scheherazade. Nuds shot that down because he would have to be Judal and he doesn’t want to show his abs. I suggested that Nuds be Titus instead of Scheherazade but that was brushed off pretty quickly.

So I started thinking. How could we make this work? After staring at an image of the cast for a couple minutes, the idea finally hit me. We could do Sinbad, Yunan, and Judal because all three of them have some kind of long history with each other. Yunan raised the first dungeon and suggested Sinbad conquer it; Sinbad conquered the dungeon and is Yunan’s King’s Candidate; Judal raised a couple dungeons for the Kou Empire but Sinbad conquered them instead.

Magically, we all ended up getting what we wanted.

The next thing I know, we’re going fabric shopping. Luke bought bottom weight in hunter green and a linen look fabric. I insisted he get a lining for the pants at the very least to help make them last longer. We’ve got a ton of interfacing leftover from other projects that he can use. Nuds bought blue and purple suiting, and white linen along with gold bias tape. I honestly should have made him get a lining too but we’re a little too concerned with how we’re going to make this without making him look stupid in a dress.

The boys are going to be sewing their own costumes this time around with a little guidance from me with regards to patterning and construction order. Since I already have all of the fabric for Judal, I ordered my wig from Arda today and will get it some time this week. I’ll be using Malindachan’s tutorial as a guide but I will probably make a few modifications as I see fit. The last thing I have to decide on is how to make Judal’s jewelry but I will probably end up using rolls of Worbla and some kind of clasp for the necklace.

We’re doing Magi, guys. And I had absolutely nothing to do with this decision.

Funny how that works.

Leave a comment

Filed under Cosplay, Magi

cosplay thoughts | the mockup

Someone asked me on my Facebook account what a mock up was. It occurred to me that while mockups are standard in the fashion industry, a lot of cosplayers simply don’t bother with them for a myriad of reasons.

First of all, what is a mockup?

Simply put, it is a crappy version of your final project. A mockup allows you to test the fit, pattern, and construction of a garment or piece without wasting expensive materials. They are typically made of a cheap material like old bedsheets, miscellaneous remnants, or a cotton muslin with a low thread count/sq. inch. Industry professionals also suggest using a cheap material that will mimic the final product, i.e. use cheap knit to make mock ups of more expensive knit pieces.

Sounds pretty reasonable, right? After all, for us cosplayers, it is instinct that guides us to pattern out all our armor pieces before we start cutting out our thermoplastics and foam. Why can’t we do the same for fabric?

Here are reasons that I’ve heard from various people (including my young foolish self) as to why they don’t make mockups:

  1. They take way too much time. It’s true. Making a mockup requires a lot of time and if you’re working in a time crunch, you simply don’t have that luxury.
  2. It’s extra money. Okay. Sure. Muslin runs about 2.99/yard. I’ll give you that.
  3. That’s a thing? Oh Lord, that’s the most common reason I’ve ever heard.

To respond to all of these reasons, all of which are completely valid reasons to not make a mockup, I present reasons why you should make a mock up.

  1. They take way too much time. Let me paint this scenario for you: my ego, the very id of my essence, lives and dies by the mantra “go big or go home.” So when my friend handed me this image:black_lilymy first thought was, “Damn. That’s going to be a lot of satin.”And it was.I made a mock up of C.C. just so I would know exactly how much material I needed and how much time it would take. From my project notes, you know how the final product was made. My mock up took me about three weeks to perfect and it took me another three months to finish the entire dress with all of its embellishments.

    Think of it this way: had I not made my mockup, I would have spent another $100 dollars buying extra material to make up for my blunders. I was in grad school when I made this dress; I didn’t have an extra $100 dollars. No amount of coupon hoarding would have saved me from that fate.

    In short, take the time to make a mock-up. You will save more money that way in the long run. Also, the final construction process will go much smoother because your muscle memory will kick in and help you out!

  2. It’s extra money. Continuing on from the previous thought, the cost for a mock-up is quite minimal in comparison to the cost of materials. If you are smart, Jo-ann’s will often put muslins and broadcloth on sale for a decent price. During Firefly Frenzy, I bought 10 yards of muslin for $10. That’s a steal.Use your coupons and sales. If you already do that for materials, it won’t be that much to add on a couple yards of cheap cotton. Jo-ann always has a sale going on. Buy your mockup materials during one sale, and when you’re done, buy your final materials during the next. You also will not need to include extra material for mistakes if you make a mock-up and will save money in the end!
  3. That’s a thing? Yes. Yes it is. You should do the thing.

Other reasons to make a mockup:

  1. Test any weird dye baths! Got to do some gradient dyeing? You can dye your mockup first before you dye scraps of your final material to see if you need to adjust any of your dye baths or use a different technique. But ALWAYS test your final material before you dye your final garment! A lot of fabrics may not take to the dye the same way cotton muslin does.
  2. Commissions. I will not make a commission for anyone unless I have made a mockup first. I have two exceptions to that rule: One is my little brother, who is easily accessible and whose body proportions run true to industry, and the other is my best friend, Berry Bunny Cosplay, who I have made several pieces for over the years and whose proportions I am familiar with. But still. I make mockups for them too.
  3. Boredom. Too broke to buy nice materials but going out of your mind from having nothing to do? Make a mockup of one of your future projects from spare materials left over from past projects. When you do have the money to make the final costume, you’ve already made your pattern!

I hope this post gives you some extra insight about mockups! Please leave a comment if you have any questions. Alternatively, you can reach me through email or on Facebook.

Leave a comment

Filed under Cosplay

[cosplay guide] yoon | akatsuki no yona

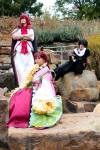
And here it is! My secret cosplay for spring!!!

I fell in love with Akatsuki no Yona after the first five minutes. It’s everything I love in a story. There’s best friends, tragic loves, political intrigue, mysticism, bishonens, and dragons.

My secret other half must be Yoon because with the amount of marriage proposals we get, we could build our own harems. Not to mention, I take care of most of the things around my apartment. thanks baby roomies.

At the time I started this cosplay, there were only three other people in the world who had ever posted images and WIPs of Yoon. Since this blog is a conglomeration of my progress and workflow, it would only make sense that I write about what I did to build this cosplay.

Let’s begin!

Yoon.(Akatsuki.no.Yona).full.1772915

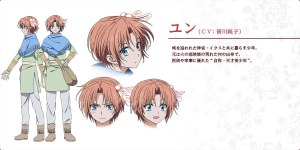
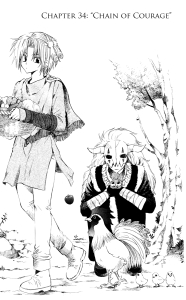
This is Yoon. His anime outfit is colored slightly different from the manga version and the poncho wraps differently around him too. I chose to make the anime outfit because I loved the color scheme more. Also, with the recent completion of the anime and the mass attention Crunchyroll and Funimation has given AnY, I figured this would be a more recognizable outfit. Although in true Callie style, I combined my favorite aspects of each version into one.

Yeah no

Yeah no

For something so simple, the devil lies in the details. Just like Haku.

I chose cottons for the bulk of my materials because this was supposed to be something for fun and not competition. Cottons also come in a wide array of colors which made my job a lot easier. Though if I were to compete in this, I can justify the use of cottons because Yoon is a poor boy living in complete isolation with only Ik-soo for company. Cottons = practicality.

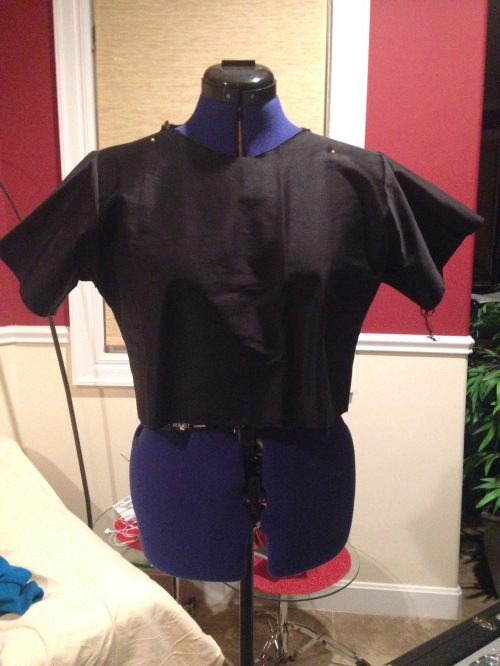
His pants, tunic, sash, and arm warmers are fairly easy to recreate. I put pockets in his pants just so I would have them but I semi-regret doing that because it only made more work for me to get them to lay flat afterwards. The trick to making his tunic sit right is the wide collar that is usually hidden under the poncho. You can really see it in these images:

15367651794_132b0fdceb_b

Yoon_manga

Here you can see there is one other layer: a khaki or cream colored undershirt depending on the screen shot you pull up. I have one in each color but I think I’ll ultimately wear the cream undershirt. The manga version has three seams running down the front but they don’t appear to serve any kind of purpose so in the interest of time, I didn’t put them in.

I initially wanted a flannel to make his poncho because that’s why he wears it: for warmth. Unfortunately, I didn’t find a blue I liked that matched with the green I ultimately chose so it’s done in cotton. For the fringes, I went with the manga version and used three different shades of blue embroidery floss blended together to bring some depth and interest to the poncho. To attach them, I used my fringe method to make each tassel and knotted small sections. It saved me the trouble of cutting strips of cotton and sealing them with Fray Check even though the fringe method was more time consuming.

For his boots, I didn’t find a pair of tassel boots I liked so I made my own shoe covers. I got tired of buying shoes for cosplay so when my favorite boots finally got a hole in them, I put velcro around the edges of the shoe, and used them as an all-around base shoe for different cosplays. I used suede cloth to make both the boots and the fringe and sealed the edges with Fray Check.

I also used the same suede cloth to make his bag. It is lined in left over khaki cotton I had and fully functional.

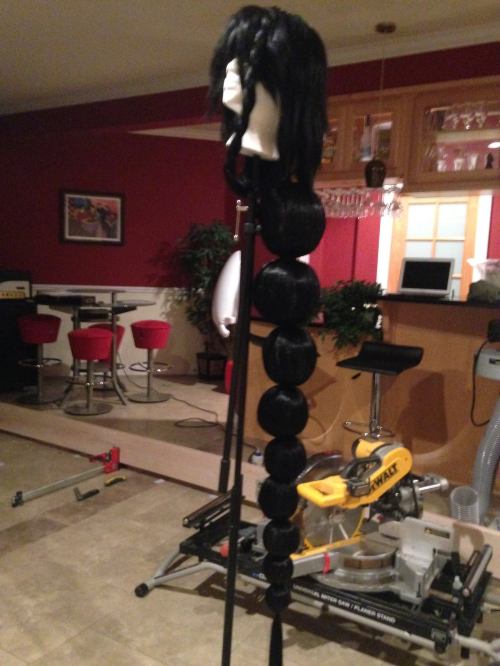
Accessory time! I bought small feathers and used some packing foam to build a base for the two “cotton balls” seen at the base of his hair accessory because the feathers I bought wouldn’t fluff out enough. I covered this foam bases with fluffy feather fragments, fluffed them out to make them look organic, and sewed two small feathers. All of this was attached to a wig extension clip. I made the necklace seen in the manga just because I thought it was pretty. :3

I bought aqua blue contacts from Pinky Paradise. Yoon has beautiful sapphire colored eyes and I wanted a set that was subtle enough for every day wear but striking enough to stand out in the light. You can find my review of these lenses here.

The final piece of this cosplay was the wig and it was by far the hardest part of the entire costume. I contacted my good friend Rin for a wig styling commission and we set about finding the perfect wig.

I’m very fond of Epic Cosplay wigs so I went there first. Completely torn between their peach blonde and cocoa brown Apollo wigs, I went to Rin with the problem and we decided on the peach blonde so we could tea dye it a shade darker. But… when I went to buy it, it went out of circulation! Pretty bummed, I searched through Arda, eBay, and Amazon before stumbling across a beautiful wig on the Five Wits. It was a perfect match for color and a little long but nothing a good trim can’t fix.

Rin is a wizard with wigs and I’ve always wanted her to style something for me. Given her love for AnY, I knew she would be the only person I could trust to get this hairstyle right. The day after my wig came in, I went over to her place to have it styled!

It took me about four or five days to make all of this because I was working on my thesis at the same time. I can’t wait until photos from the Oklahoma Cosplay Shoot come in! Many thanks to Ashley for introducing this beautiful tale to me, and to Rin for her assistance with my wig. I dedicate this cosplay to you both!

Ja ne~
Callie

Leave a comment

Filed under Akatsuki no Yona, Cosplay

kinomoto sakura || day three

I know I haven’t been posting updates but it’s been a pretty standard job so far on Sakura. Rin helped me pick out materials and I started cutting them out.

Today I decided I couldn’t put it off much longer so I went ahead and tinted the carnation pink with a mixture of pearl gray and petal pink. I’m hoping I can replicate the dye later when I finally get more carnation cotton for the shorts. I’m also using this dye bath as a starting point for dying my white knit dark fuchsia to match the darker pink of the outfit.

Leave a comment

Filed under Cosplay